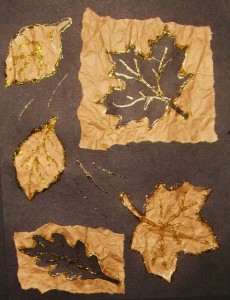
What is more elegant than black and gold? Adding the look of leather! You have to see this made up to really appreciate how beautiful it is.
Supplies:
- Black construction paper
- Brown paper grocery bag
- Black paper for leaves (If you outline the leaves on the pattern with green Sharpie, you can copy on black paper)
- Leaves (Pattern)
- Water
- Iron
- Glue stick
- White glue
- Scissors
- Gold glitter glue
Directions:
If you’d like to save time, and to do the project in one class period, prepare the paper bags ahead of time.
- Cut down the seam of the brown paper bag, and cut the bottom off of the bag. Scrunch the paper into a ball and unfold it again. Dip the paper into the water, take it out, ball it up again and then squeeze as much of the water out as you can, being careful to not tear the paper.
- Smooth the paper out flat (it will keep a wrinkled look). Iron the paper to dry it. When dry, cut half of the paper to fit the copy machine to print leaves on. The rest of the bag will be used to tear squares or rectangles for the project.
- Choose to use either three black and two brown, or three brown and two black leaves for your project. Then cut out the leaves you are going to use.
- Tear two or three squares or rectangles to back the black leaves. The brown leaves will be glued on the background sheet.
- Glue the leaves to the black background. Hold the leaves down for a little while so they adhere.
- Using the gold glitter glue, glue over the edges of all the leaves. Also draw veins, inside the leaves, with the glitter glue. Add a few curved lines that show the leaves fluttering down.
A really outstanding look can be achieved by backing the completed picture on a 12″ x 18″ piece of black paper, or by framing it in a black matted picture frame.
Thanksgiving Projects Gallery:

